SPF, DKIM, and DMARC Explained: Email Authentication Setup
If you send emails from your business domain, those emails might not be reaching their destination. Gmail, Yahoo, and Microsoft now require email authentication. Without it, your messages can land in spam or get rejected entirely.
This guide explains what SPF, DKIM, and DMARC are, why they matter, and exactly how to set them up. We'll cover where to find the DNS values you need, what records to create, and how to verify everything works.
If you want deeper technical detail on any single protocol, we have dedicated guides on what SPF is and how it works, what DKIM does and why it matters, and what DMARC is and how to configure it. This post ties them together and focuses on the practical setup.
What These Protocols Do
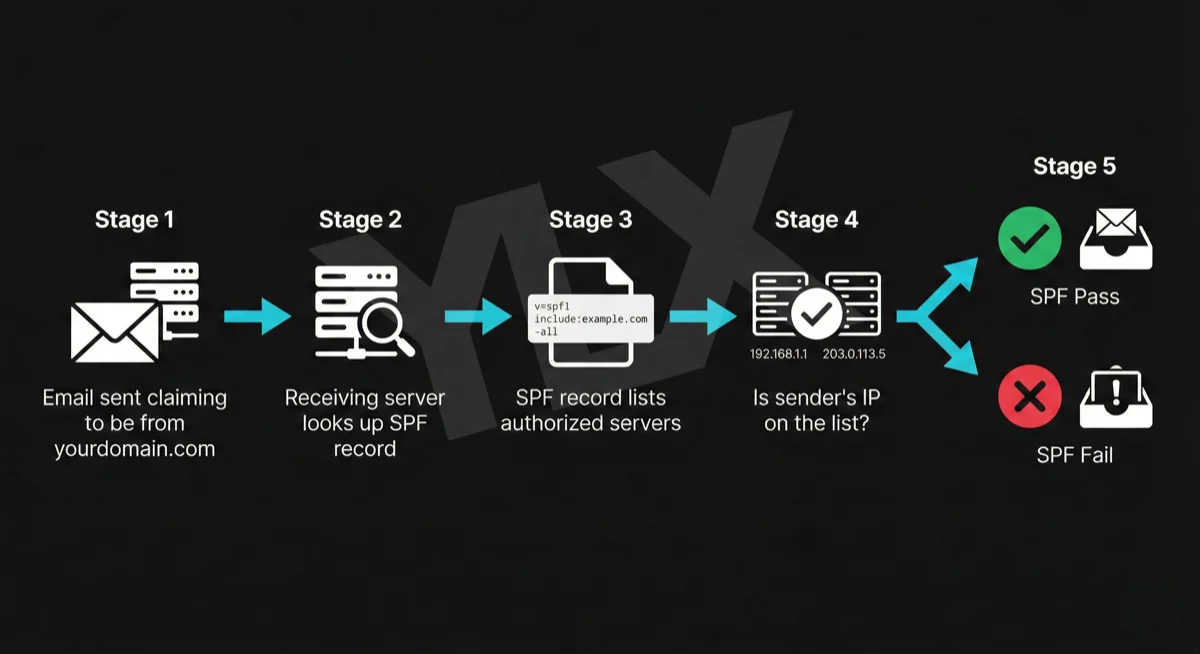
SPF (Sender Policy Framework) tells receiving servers which servers are allowed to send email from your domain. It's a list you publish in DNS that says "these IP addresses can send as me."
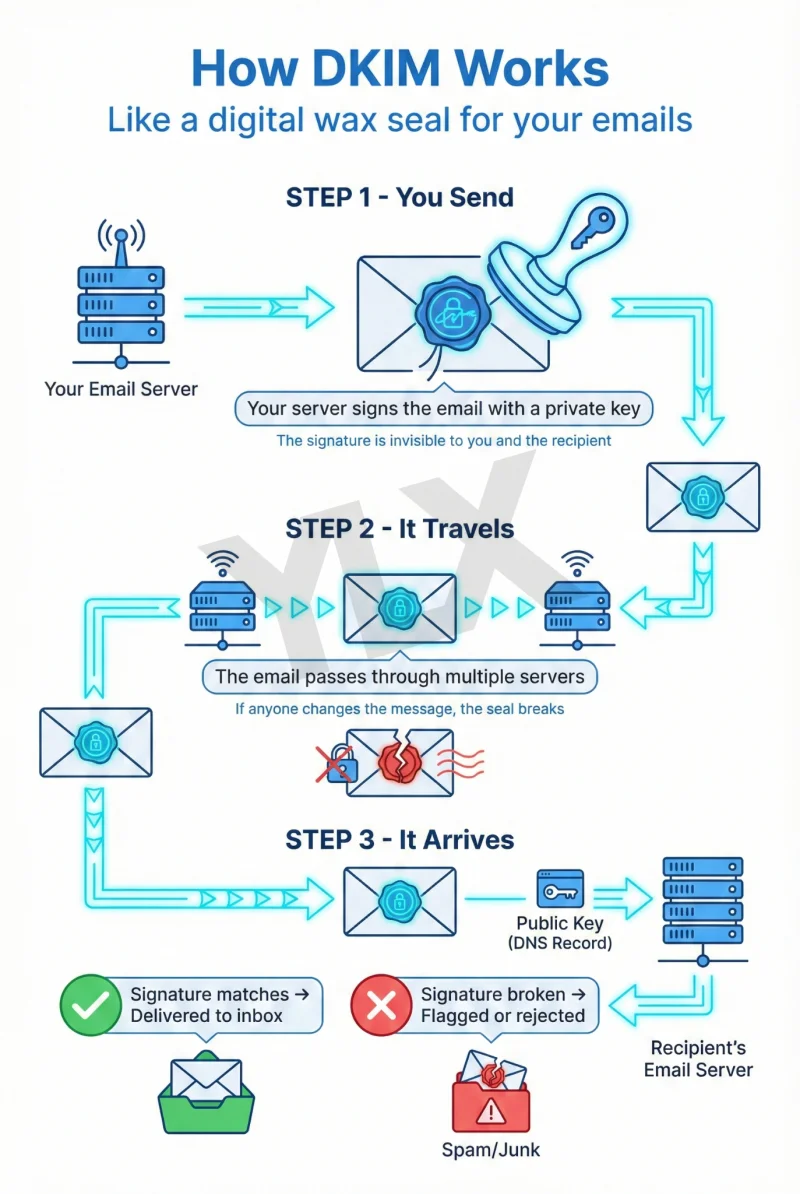
DKIM (DomainKeys Identified Mail) adds a digital signature to your emails. The receiving server uses a public key (also published in DNS) to verify the signature. If it matches, the email hasn't been tampered with and came from an authorized sender.
DMARC (Domain-based Message Authentication, Reporting, and Conformance) ties SPF and DKIM together and tells receiving servers what to do when emails fail authentication. It also sends you reports so you can see who's sending email as your domain.
You need all three. SPF alone can be bypassed. DKIM alone doesn't specify what to do with failures. DMARC requires the other two to function.
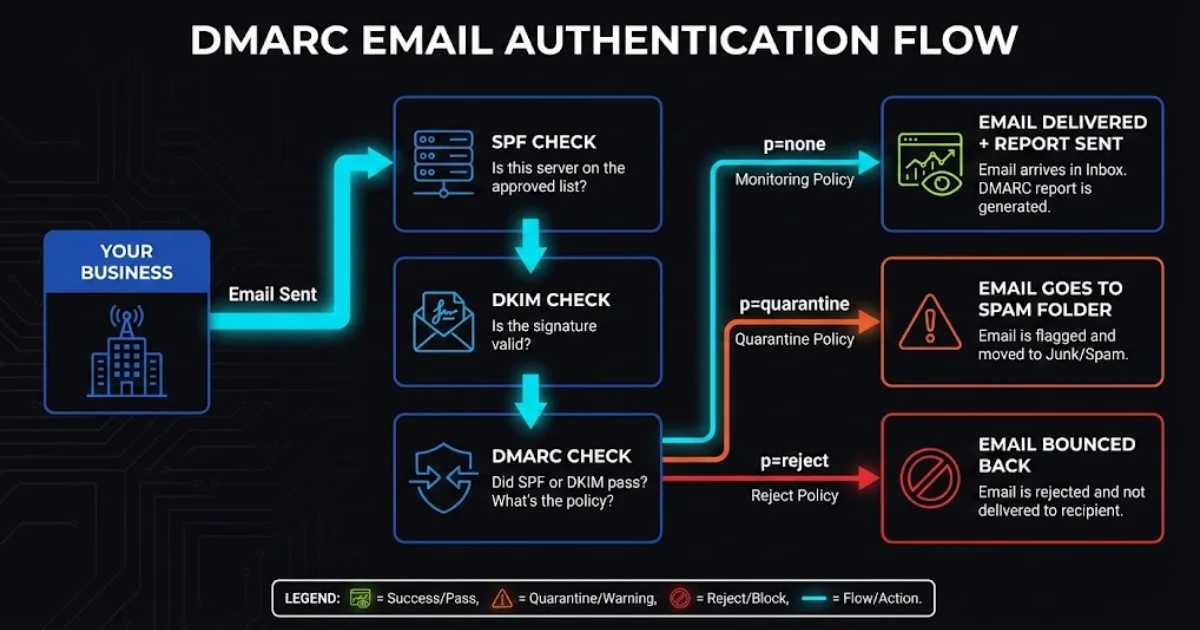
How SPF, DKIM, and DMARC work together: SPF verifies sender IP, DKIM verifies message integrity, DMARC ties them together and sets policy
Why This Matters Now
Major email providers started requiring authentication in 2024, with enforcement tightening through 2025:
| Provider | Requirement | Enforcement |
|---|---|---|
| Gmail | SPF + DKIM + DMARC for bulk senders (5,000+/day) | Started Feb 2024; ongoing enforcement (opens in a new tab) |
| Yahoo | SPF + DKIM + DMARC for bulk senders | 2024 sender guidance (opens in a new tab) |
| Microsoft | SPF + DKIM + DMARC for high-volume senders | 550 5.7.515 enforcement guidance (opens in a new tab) |
Microsoft's enforcement is particularly strict. Non-compliant messages to Outlook, Hotmail, and Live consumer inboxes are rejected with error code 550 5-7-515 (opens in a new tab).
They don't go to spam first. They bounce.
Even if you're not a bulk sender, authentication improves deliverability. Google's sender guidelines (opens in a new tab) state that unauthenticated messages may be marked as spam or rejected. Authenticated emails are simply more trusted.
The security stakes are real too. The FBI's IC3 PSA on BEC (opens in a new tab) reports over $55 billion in global exposed BEC losses from October 2013 through December 2023. Email authentication won't stop all attacks, but it makes it harder for scammers to impersonate your domain.
Setting Up SPF
SPF is a single TXT record in your domain's DNS. It lists every server authorized to send email as your domain.
Where to Get Your SPF Values
Your SPF record needs to include every service that sends email from your domain. Here are the include statements for common providers:
Email hosting:
- Google Workspace:
include:_spf.google.com(Google documentation (opens in a new tab)) - Microsoft 365:
include:spf.protection.outlook.com(Microsoft documentation (opens in a new tab))
Marketing and transactional email:
- Mailchimp:
include:servers.mcsv.net(Mailchimp documentation (opens in a new tab)) - SendGrid:
include:sendgrid.net(SendGrid documentation (opens in a new tab)) - Mailgun:
include:mailgun.org(Mailgun documentation (opens in a new tab)) - HubSpot:
include:spf.hubspot.com(HubSpot documentation (opens in a new tab))
Creating Your SPF Record
Combine all your senders into a single record. You can only have one SPF record per domain.
Example for a business using Microsoft 365 and Mailchimp:
Type: TXT
Host: @ (or leave blank, depending on your DNS provider)
Value: v=spf1 include:spf.protection.outlook.com include:servers.mcsv.net -all
What each part means:
v=spf1: This is an SPF recordinclude:...: Authorize servers from this provider-all: Reject emails from servers not listed (hard fail)
SPF record breakdown: v=spf1 declares the record type, include statements authorize email providers, -all rejects unauthorized senders
Use -all (hard fail) if you have DKIM and DMARC set up. Use ~all (soft fail) during initial setup while you verify everything works.
Adding the Record
- Log into your DNS provider (Cloudflare, GoDaddy, Namecheap, etc.)
- Find DNS settings for your domain
- Add a new TXT record with the values above
- Save and wait for propagation (usually minutes, up to 48 hours)
Verifying SPF
Use MXToolbox SPF Checker (opens in a new tab) to verify your record is published correctly. Enter your domain and check for errors.
Common mistakes:
- Multiple SPF records (you can only have one; combine them)
- Forgetting a service that sends email (newsletters, CRM, invoicing tools)
- Too many DNS lookups (SPF allows max 10; use
include:sparingly)
If you're hitting the 10-lookup limit, you have a few options. You can use SPF flattening services that convert includes to IP addresses. You can also consolidate sending providers or move some senders to subdomains.
Setting Up DKIM
DKIM requires two things: enabling signing in your email provider, and adding a DNS record with your public key.
Google Workspace
- Go to
admin.google.com - Navigate to Apps > Google Workspace > Gmail
- Click Authenticate email
- Select your domain and click Generate New Record
- Choose 2048-bit key length
- Copy the TXT record value Google provides
Add to DNS:
Type: TXT
Host: google._domainkey
Value: v=DKIM1; k=rsa; p=MIIBIjANBgkqh... (the key Google generated)
- Return to Google Admin and click Start Authentication
Note: If you just enabled Gmail for your domain, wait 24-72 hours (opens in a new tab) before generating the DKIM key or you'll get an error.
Microsoft 365
- Go to the Microsoft 365 Defender portal (
security.microsoft.com/dkimv2) - Select your domain
- Click Create DKIM keys
- Copy the two CNAME records Microsoft provides
Add to DNS (Microsoft documentation (opens in a new tab)):
Type: CNAME
Host: selector1._domainkey
Value: selector1-yourdomain-com._domainkey.yourtenant.onmicrosoft.com

Type: CNAME
Host: selector2._domainkey
Value: selector2-yourdomain-com._domainkey.yourtenant.onmicrosoft.com
Microsoft generates these values specifically for your domain. The yourdomain-com part uses dashes instead of dots. yourtenant is your organization's Microsoft 365 tenant name (the part before .onmicrosoft.com). Copy these exactly from the Defender portal.
- Wait for DNS propagation (can take minutes to hours)
- Return to Defender portal and enable Sign messages for this domain with DKIM signatures
If you see "CNAME record does not exist" when enabling, wait longer for DNS propagation. Microsoft needs to detect the records before you can turn on signing.
Mailchimp
Follow Mailchimp's domain authentication guide (opens in a new tab):
- Go to Audience > Settings > Domains
- Click Authenticate next to your domain
- Copy the two CNAME records Mailchimp provides
- Add them to your DNS
- Return to Mailchimp and click Verify
Mailchimp uses CNAME records that point to their servers, so they handle key rotation automatically.
SendGrid
Follow SendGrid's domain authentication guide (opens in a new tab):
- Go to Settings > Sender Authentication
- Click Authenticate Your Domain
- Follow the wizard to get your CNAME records
- Add them to DNS (typically two records with
s1.domainkeyands2.domainkey) - Verify in SendGrid
Verifying DKIM
Use MXToolbox DKIM Lookup (opens in a new tab). Enter your domain and selector. For example, use google for Google Workspace and selector1 for Microsoft 365.
You can also send a test email to a Gmail account, open it, click the three dots menu, select "Show original," and look for dkim=pass in the Authentication-Results header.
Setting Up DMARC
DMARC is a TXT record you create yourself. It tells receiving servers what to do when SPF or DKIM fails, and where to send reports.
Creating Your DMARC Record
Start with a monitoring policy:
Type: TXT
Host: _dmarc
Value: v=DMARC1; p=none; rua=mailto:dmarc-reports@yourdomain.com
What each part means:
v=DMARC1: This is a DMARC recordp=none: Don't take action on failures yet (monitoring only)rua=mailto:...: Send aggregate reports to this address
Where to Send Reports
DMARC reports are XML files that show who's sending email as your domain. You have two options:
Option 1: Your own email address. Simple, but the reports are technical XML that's hard to read.
Option 2: A DMARC monitoring service. These parse the XML into readable dashboards.
Cloudflare DMARC Management (opens in a new tab) is free for all Cloudflare users. If your DNS is with Cloudflare:
- Go to Email > DMARC Management
- Click Enable DMARC Management
- Cloudflare adds a
ruaaddress to receive and process reports
Other options include Valimail (free tier available), dmarcian, and Postmark.
DMARC Policy Progression
Don't jump straight to enforcement. Follow this timeline (recommended by dmarcian (opens in a new tab)):
Week 1-4: p=none (monitoring)
v=DMARC1; p=none; rua=mailto:dmarc@yourdomain.com
Collect reports. Identify all legitimate email sources. Fix any SPF or DKIM issues.
During this phase, reports will show you every server sending email as your domain. You'll likely discover services you forgot about: that old CRM, the invoicing tool, the appointment scheduler. Each one needs to be authenticated before you move to enforcement.
Week 5-8: p=quarantine (soft enforcement)
v=DMARC1; p=quarantine; pct=50; rua=mailto:dmarc@yourdomain.com
The pct=50 applies the policy to only 50% of failing messages. This lets you catch problems before they affect all your email.
Week 9+: p=reject (full enforcement)
v=DMARC1; p=reject; rua=mailto:dmarc@yourdomain.com
Only move to reject after monitoring reports and confirming your legitimate senders are passing authentication. This is the goal state, which tells receivers to block unauthenticated email claiming to be from your domain.
Verifying DMARC
Use MXToolbox DMARC Lookup (opens in a new tab) to check your record. It should show your policy, reporting address, and any syntax errors.
Common Mistakes to Avoid
Common email authentication mistakes: multiple SPF records, forgetting third-party senders, jumping to p=reject too fast, not checking DMARC reports
Multiple SPF records. You can only have one. If you have two, both fail. Combine all your include: statements into a single record.
Forgetting third-party senders. That invoicing tool, CRM, or appointment system that sends email as your domain? It needs to be in your SPF record, and ideally signing with DKIM.
Jumping to p=reject too fast. If you haven't identified all your legitimate email sources, you'll block your own email. Monitor for at least four weeks.
Not checking reports. DMARC reports tell you what's happening. If you're not reading them, you're flying blind. Use a service like Cloudflare DMARC Management to make them readable.
Mismatched domains. DMARC requires alignment. The domain in your From header must match, or be a subdomain of, the domain used in SPF or DKIM authentication. If you send from marketing.example.com but authenticate as example.com, check your alignment settings.
Verification Checklist
Before you're done, verify everything:
SPF:
- Single TXT record at root domain
- Includes all email-sending services
- Passes MXToolbox SPF check (opens in a new tab)
DKIM:
- Key generated in email provider
- DNS record published (TXT or CNAME)
- Signing enabled in provider settings
- Passes MXToolbox DKIM check (opens in a new tab)
DMARC:
- TXT record at
_dmarc.yourdomain.com - Report address configured
- Passes MXToolbox DMARC check (opens in a new tab)
- Reports being received and reviewed
Test email:
- Send email to Gmail, check "Show original" for
spf=pass,dkim=pass,dmarc=pass
To check this: send an email from your business domain to a Gmail account, open the email, click the three dots menu in the top right, and select "Show original." Look for the Authentication-Results header. It should show spf=pass, dkim=pass, and dmarc=pass. If any show fail, that protocol needs attention.
What If You're Not Technical?
If DNS records and authentication protocols aren't your thing, that's fine. Here's what to do:
- Ask your IT person or email provider. Most can set this up or confirm it's already done. If you use Google Workspace or Microsoft 365, your admin can configure this through the admin console.
- Check your current status. MXToolbox (opens in a new tab) can show what records exist. Just enter your domain and look for SPF, DKIM, and DMARC results.
- Know the right questions. Ask: "Do we have SPF, DKIM, and DMARC set up? What's our DMARC policy? Are we getting reports?"
If the answer to any of those is "I don't know," it's worth investigating before your emails start bouncing.
Most web hosting providers and email services publish setup docs for authentication. Search "[your provider] SPF DKIM setup" to find the right guide. If you're on Google Workspace or Microsoft 365, much of this can be configured from the admin interface.
Need Help With Email Authentication?
If you're not sure whether your domain is set up correctly, we can take a look. We'll check your SPF, DKIM, and DMARC records, review your authentication status, and explain what we find in plain terms.
Get a free email authentication review: Contact us at info@ylx.ca
Analysis FAQ.
What are SPF, DKIM, and DMARC?
SPF tells receiving servers which servers can send email from your domain. DKIM adds a digital signature to verify emails haven't been tampered with. DMARC ties them together and tells servers what to do when emails fail authentication. You need all three for complete email protection.
Do I need SPF, DKIM, and DMARC for my business email?
Yes. Major providers now enforce email authentication requirements. Without it, your emails may land in spam or get rejected entirely. Microsoft can reject non-compliant high-volume messages with error 550 5.7.515, and Google may defer or reject mail that doesn't meet sender requirements.
How do I set up SPF, DKIM, and DMARC?
All three are set up through DNS TXT records. SPF lists authorized sending servers, DKIM requires publishing a public key, and DMARC specifies your authentication policy. Most email providers like Google Workspace and Microsoft 365 provide the values you need to add to your DNS.
What happens if I don't have email authentication?
Your emails may be rejected or marked as spam. Business email compromise cost companies $2.77 billion in 2024. Without authentication, scammers can easily send emails pretending to be your business, damaging your reputation and potentially defrauding your customers.
Tagged with

Further Reading
Related Analysis.
What Is DMARC and Why Your Business Emails Depend on It
DMARC protects your domain from spoofing and helps email deliverability. Learn how it works with SPF and DKIM, what providers enforce now, and what to do next.
What Is DKIM? How Email Signatures Protect Your Business
DKIM proves your emails are genuine. Learn how this digital signature works, why Gmail and Microsoft now require it, and how to check if your domain has it.
What Is SPF? The First Line of Email Authentication
SPF tells email providers which servers can send from your domain. Learn how it works, why Gmail and Microsoft require it, and how to set it up correctly.